Have you ever finished a massive cleanup project, wiped your hands, and thought to yourself, “Well, that is finally done,” only to find the mess creeping back a few weeks later? It is a frustrating feeling in everyday life, but when it comes to property damage in your Toronto home or business, assuming a job is finished can be a costly mistake. A remediation crew might pack up their gear, give you a thumbs up, and declare the problem solved. However, the hidden truth is that microscopic contamination may still linger behind the drywall or in the air. You cannot manage what you cannot measure.
This is exactly why verification, rather than a simple assumption, is a critical step in any property restoration project. Think of post-remediation verification as the final checkpoint for your building’s safety. It is the objective, scientific proof that the cleanup actually worked. If you have recently dealt with a contamination issue, you are likely wondering what PRV testing is, why it matters, and how it works. We are going to walk through the entire process, unpack industry jargon, and give you the confidence that your space is secure.
Key Takeaways Before We Dive In
- Trust, but verify: Remediation removes the visible problem, but only independent testing confirms the invisible threats are gone.
- Protect your investment: Skipping clearance testing leaves you vulnerable to recurring damage, liability issues, and plummeting property values.
- Know the standards: Professional testing relies on rigorous scientific methods and industry benchmarks to provide a definitive pass or fail.
- Documentation is key: A formal clearance certificate is often required for insurance claims, real estate transactions, and peace of mind.
What Is Post-Remediation Verification (PRV)?
At its core, post-remediation verification is a formal, scientific assessment conducted after a cleanup job to confirm that the affected area has been returned to a normal, safe condition. You might hear it called a few different things, but the goal is always the same.
There is a distinct difference between remediation and verification. Remediation is the physical act of removing contaminated materials, cleaning the space, and applying treatments. Verification is the process of checking that work. It is highly recommended that these two tasks be performed by entirely different companies. If the company that did the cleanup also grades their own homework, there is an inherent conflict of interest. The role of independent testing is to provide an unbiased, factual assessment of the property.
When professionals talk about achieving “clearance,” they do not just mean the room looks clean to the naked eye. Clearance means that the area meets specific, measurable criteria for safety. It means the airborne contaminants have been reduced to normal levels, the building materials are dry, and the environment is stable enough to begin reconstruction.
Why Clearance Testing Matters More Than Most Property Owners Realize
It is easy to look at a newly scrubbed room and assume you are out of the woods. But what about the things you cannot see? The hidden contamination risks after a cleanup are significant. Even the most diligent remediation contractors can miss a pocket of moisture or accidentally disturb settled particles, spreading them to other areas of the building.
The health implications of incomplete remediation are a major concern. If you skip clearance testing after mould remediation, you might be sending your family, tenants, or employees back into an environment with poor indoor air quality (IAQ). Lingering mould spores can trigger respiratory issues, allergies, and fatigue. Is the air actually clean, or does it just smell like industrial cleaning supplies?
Beyond the physical health risks, there are serious financial risks to consider. If contamination is left behind, it will eventually grow back. This leads to repeat damage, which means you will be paying for the exact same cleanup a second time. There are also notable real estate and compliance implications. If you plan to sell or lease your Toronto property, prospective buyers and savvy tenants will want proof that past issues were resolved correctly. Without the proper documentation, a previous contamination issue can tank a real estate deal or lead to difficult liability claims down the road.
What Happens If You Skip PRV Testing?
Skipping this vital step often creates a false sense of safety. You might spend thousands of dollars on a cleanup, put up new drywall, and paint the room, all while believing the threat is gone. Sadly, ignoring mould clearance testing is like putting a Band-Aid over a splinter. The surface looks fine, but the root problem is still festering underneath.
The most common consequence of skipping the verification phase is recurring mould growth. Fungi only need a tiny amount of moisture and a food source to thrive. If the remediation team missed a small leak or failed to properly dry the structural wood, the contamination will return. By the time it eats through your new drywall, the damage will be extensive.
Furthermore, you will likely suffer from consistently poor indoor air quality. Without testing, you have no idea if the HEPA filtration devices used during the cleanup actually captured the harmful particles or just blew them into the hallway. Finally, you may face legal and insurance complications. If a tenant gets sick or a new buyer discovers hidden damage, your insurance provider might deny your claim if you cannot prove that the initial cleanup was verified by an independent professional.
The PRV Testing Process
Understanding the PRV inspection process helps demystify the science behind the safety. When an environmental professional arrives at your property, they follow a rigorous sequence of steps to ensure nothing is overlooked.
Step 1: Visual Inspection
The assessment always starts with a meticulous visual inspection. The inspector is not just looking for obvious stains. They are checking the containment barriers used by the cleanup crew to ensure cross-contamination did not occur. They look for settled dust, debris, and any signs that the remediation was rushed. If the area fails the visual inspection, the testing stops immediately, and the cleanup crew must return to finish their job.
Step 2: Moisture Detection & Mapping
Moisture is the engine that drives fungal growth. Even if a surface looks dry, it might hold hidden water. Professionals use advanced moisture meters to measure moisture content in wood, drywall, and concrete. They also utilize thermal imaging cameras to scan the walls and ceilings. Thermal imaging detects slight temperature variations, highlighting hidden pockets of dampness that would otherwise remain invisible.
Also Read: How Moisture Meters & Thermal Imaging Find Hidden Water Damage
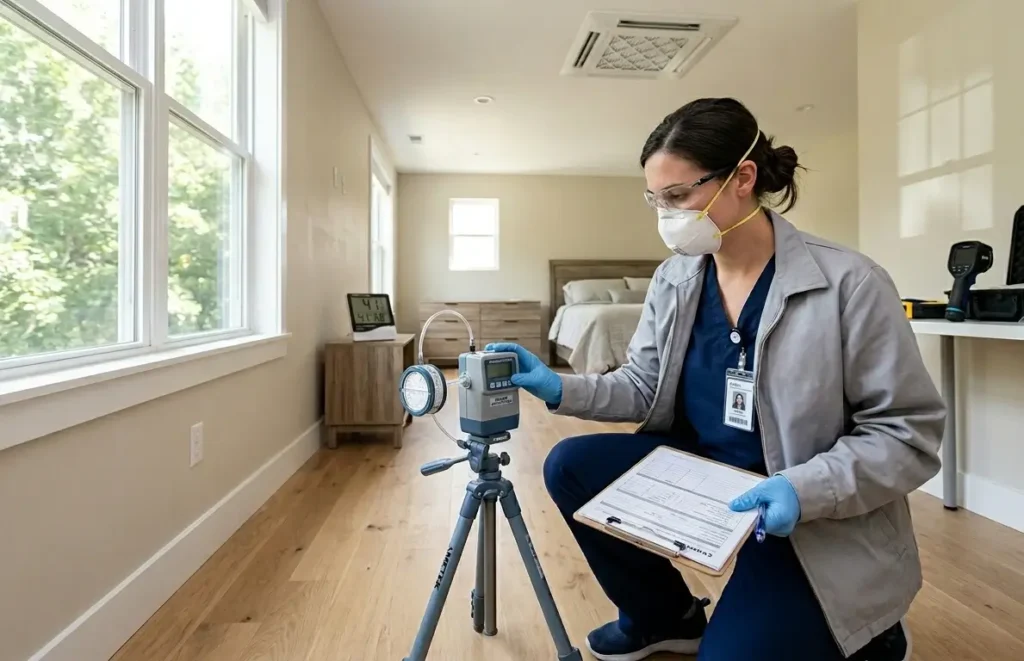
Step 3: Air Quality Sampling
Once the area passes the visual and moisture checks, it is time for air quality testing after mould removal. The inspector uses specialized pumps to draw a specific volume of air through a collection cassette. This process captures mould spores and other airborne contaminants. The inspector will typically take a sample from inside the remediated area, an unaffected part of the building, and an outside sample to establish a baseline.
Step 4: Surface Testing (if required)
In some cases, air sampling is not enough. If there is a questionable stain on a joist or a layer of dust on a counter, the inspector might recommend surface sampling. This involves using a swab or a piece of clear adhesive tape to lift particles directly off the material. This helps identify the exact genus of any remaining spores on the physical building materials.
Step 5: Lab Analysis
The collected air and surface samples are securely packaged and sent to an accredited, independent microbiology laboratory. The lab technicians examine the samples under high-powered microscopes to count the spores and identify the specific types of contaminants present.
Step 6: Clearance Report & Certification
After the lab results are in, the inspector compiles all the data into a comprehensive report. This document details the visual findings, the moisture readings, and the laboratory analysis. If the property meets the necessary criteria, the inspector will issue a formal clearance certificate.
What Does a “Passed” Clearance Test Mean?
When you receive the good news that your property has passed, what does that actually mean from a scientific standpoint? Passing does not mean the room is a sterile, hospital-grade vacuum. Mould is a natural part of our environment, and it is entirely normal to have some spores floating around.
Acceptable spore levels are determined by comparing the indoor samples to the outdoor air quality. A passed test generally means that the types and concentrations of spores inside the remediated area are similar to, or lower than, the spores found naturally in the air outside your home. If the outdoor air has a certain level of harmless baseline spores, your indoor air should mirror that profile. However, if the indoor air contains high levels of target species associated with water damage, the test is marked as a failure.
When you pass, you receive a clearance certificate. This document is worth its weight in gold. It includes a summary of the methodologies used, the laboratory results, the dates of the inspection, and a professional declaration that the environment is safe for reconstruction and occupancy.
Industry Standards for PRV (IICRC, EPA & Best Practices)
The science of environmental testing relies on strict benchmarks. If you are wondering how to properly verify mould remediation, you must look to established authorities. The most prominent benchmark in the restoration industry is the IICRC S520 standard. This document, published by the Institute of Inspection, Cleaning and Restoration Certification, outlines the precise protocols for safe, effective cleanup and the subsequent verification process.
Additionally, professionals reference EPA mould guidelines, which provide strong frameworks for assessing moisture issues and protecting public health in schools, commercial buildings, and homes. Complying with these guidelines ensures that the testing is not just a guessing game.
The importance of third-party verification cannot be overstated here. A remediation company claiming they met the IICRC S520 standard is one thing, but having an independent environmental consultant verify it provides a necessary layer of accountability. These industry standards matter for credibility. When buyers, insurers, or legal professionals review your documentation, they want to see that the mould remediation clearance standards were met using recognized, defensible methods.
When Should You Get Post-Remediation Verification Done?
Timing is everything when it comes to a post-remediation inspection. You should schedule this service immediately after mould remediation is completed, but crucially, before any new construction begins. If the contractors put up new drywall before the area is tested, you lose the ability to verify the framing behind it.
You should also consider verification after significant water damage restoration. Even if mould was not the primary issue, a major flood can leave behind hidden moisture that will eventually cause problems. Verifying that the structural drying was successful is a proactive way to protect your building.
Furthermore, you must secure a clearance test before re-occupying a property. If you moved your family out or relocated your staff during a major cleanup, you need objective proof that the air is safe to breathe before allowing them to return. Finally, testing is essential before selling or leasing a property. Being able to hand a prospective buyer a clean bill of health prevents stalled negotiations and builds immediate trust.
Cost of PRV Testing (What to Expect)
Let us address the elephant in the room. What does this service cost? The average price range for indoor air quality testing services and clearance inspections in the Toronto area typically falls between $400 and $1,200.
Several factors affect the final cost. The size of the remediated area plays a big role. A small bathroom will require fewer air samples than a flooded commercial basement. The severity of the initial contamination also matters. If the cleanup involves multiple zones with complex containment barriers, the inspector will need to spend more time on-site. Additionally, the specific testing type influences the price. Standard air sampling is relatively straightforward, but if extensive surface sampling or rushed laboratory turnaround times are required, the costs will increase.
While it might seem like an extra expense at the end of an already costly project, PRV is a worthwhile investment. Paying a few hundred dollars now to confirm the job was done right is far better than paying thousands of dollars next year to tear out brand-new drywall because the contamination grew back.
DIY Testing vs Professional PRV: What’s the Difference?
You might be tempted to swing by the local hardware store and pick up a home test kit to save a few dollars. While this is an understandable thought, it is a risky approach. The limitations of home test kits are vast. Most DIY kits simply involve setting a petri dish out in the room and waiting to see if anything grows. Since mould spores are naturally present in all air, something will almost always grow in a petri dish.
This leads to significant accuracy and reliability issues. A home kit cannot tell you the concentration of spores in the air, nor can it distinguish between a normal outdoor spore that blew in through an open window and a dangerous marker of water damage. It also lacks the crucial visual and moisture assessments.
This is why professional testing is heavily recommended. A certified inspector brings calibrated equipment, an understanding of building science, and the ability to interpret complex lab data. They look at the entire environment holistically, rather than just staring at a fuzzy spot in a plastic dish.
How PRV Protects Property Value and Long-Term Health
Property ownership is a long game, and making smart decisions during a crisis sets you up for future success. By investing in proper verification, you actively prevent recurring damage. Nipping the problem in the bud ensures the structural integrity of your building remains intact.
Moreover, it dramatically improves indoor air quality. Breathing clean air is foundational to good health, and professional testing ensures that you are not unknowingly inhaling harmful particulates.
When it is time to list your property, a clearance certificate builds immense confidence among buyers and renters. Real estate transactions often fall apart when a home inspector discovers signs of past water damage. If you can instantly produce a lab-backed document proving the issue was resolved perfectly, you neutralize the buyer’s anxiety. In commercial settings, this same documentation greatly reduces liability risks, protecting property managers from potential lawsuits related to unsafe working conditions.
Also Read: Signs of Hidden Water Damage in Older Homes & What to Do
Choosing the Right PRV Testing Provider
Not all environmental testing companies are created equal. When searching for a provider, look for specific certifications and qualifications. Ensure the company employs certified indoor environmental professionals who understand the nuances of building science and microbiology.
As mentioned earlier, independent testing is paramount. The company you hire to verify the cleanup must have no financial ties to the company that performed the remediation. This ensures you get the honest, unvarnished truth.
Pay attention to their equipment and testing methods. A reputable inspector will gladly explain how their moisture meters work and why they are taking specific samples. Finally, look for transparency in reporting. You should receive a clear, easily understandable document that outlines the findings without resorting to confusing jargon.
Ensuring Your Property Is Truly Safe After Remediation
We have covered a lot of ground, from the science of air sampling to the complexities of industry guidelines. The overarching theme is simple. Remediation is only half the battle. Without objective verification, you are flying blind, hoping that the cleanup crew caught every last spore and dried every single drop of water.
Protecting your Toronto property requires diligence. Whether you are dealing with the aftermath of a burst pipe, a flooded basement, or a hidden ventilation issue, taking the extra step to verify the cleanup is the smartest move you can make. It protects your health, safeguards your wallet, and preserves the value of your real estate.
If you are standing in a newly cleaned room, wondering if it is actually ready for drywall, do not leave it to chance. Having a qualified team verify your space can deliver clarity and confidence before moving forward. If you want to ensure your property is truly safe after remediation, contact the professionals. Feel free to schedule a post-remediation verification inspection with Property Worx today, and let us help you breathe easy again.