Imagine this: you walk into your Toronto basement after a heavy spring thaw or an intense summer storm, only to find an unexpected puddle spreading across the floor. Maybe it is a burst pipe in the kitchen or a sneaky roof leak that has gone unnoticed for days. You mop up the visible water, dry the floors with towels, and breathe a sigh of relief. But the real problem often begins after the surface water is gone. Moisture has a habit of lingering behind walls, beneath floorboards, inside insulation, and beneath carpet padding.
You are likely asking yourself how to stop the fuzzy, unwelcome guest from making itself at home. Knowing how to prevent mould after water damage restoration is a top priority for protecting your property and your family’s health. The clock is ticking. You have a crucial 24 to 48 hours to take action because mould thrives in damp, humid, and poorly ventilated environments.
This guide walks you through the essential drying steps, the required cleaning methods, and the materials you might need to remove to save your home. We will cover the warning signs of growth, professional restoration methods, and long-term prevention strategies. At Property Worx, we handle emergency water damage restoration across the GTA every day. We know exactly what it takes to protect your home and restore your peace of mind.
Key Takeaways
- Act Fast: You have a 24 to 48-hour window to dry out water damage before microbial growth begins.
- Find Hidden Moisture: Surface drying is not enough. Water travels behind baseboards, under subfloors, and into wall cavities.
- Know Your Water Type: Clean water is manageable if caught early, but gray or black water requires professional water damage cleanup and disinfection.
- When in Doubt, Call the Pros: Professional mould-prevention services use industrial air movers, dehumidifiers, and thermal imaging to ensure your home is truly dry.
Why Mould Grows After Water Damage
Mould Needs Moisture to Grow
Mould spores are naturally present everywhere indoors and outdoors. They float through the air seamlessly, waiting for the perfect environment to settle. These spores become a massive problem when they find moisture, warmth, oxygen, and organic material to feed on. Common household building materials like drywall, wood framing, carpet, paper, and insulation act as an all-you-can-eat buffet for these spores. When you add water to the mix, you create the ultimate breeding ground.
Why the First 24–48 Hours Matter
If you are wondering, “How fast does mould grow after water damage?”, the answer is surprisingly quick. Within 24 to 48 hours, spores can latch onto damp surfaces and begin colonizing. If affected materials are not dried swiftly, you will likely face a much larger headache down the road. Fast water extraction, aggressive drying, and strict humidity control are your best lines of defence to prevent mould after a leak or flood.
Hidden Moisture Is the Biggest Risk
A room can look perfectly dry to the naked eye while a dangerous amount of moisture remains trapped out of sight. This hidden moisture after water damage is the primary culprit for future growth. Water easily sneaks into tricky areas:
- Wall cavities
- Subfloors
- Carpet padding
- Baseboards
- Cabinets
- Insulation
- Ceiling cavities
- HVAC ducts
Also Read: What to Expect During a Mold Remediation Inspection Process
Immediate Steps to Prevent Mould After Water Damage
Stop the Source of Water
Before you can even think about water damage mould prevention, you need to stop the intrusion. If a pipe bursts in the middle of the night, rush to shut off the main water supply to your home. Stop any leaking appliances by turning off their dedicated valves. If a heavy storm has compromised your roof, try to cover the leak temporarily with a tarp, provided it is safe to do so. Always avoid entering flooded areas where electrical risks are present.
Remove Standing Water Quickly
Once the source is stopped, you must remove the standing water. For minor clean water spills, thick towels might do the trick. However, if you are dealing with a larger volume, a wet/dry vacuum or a submersible pump is necessary to quickly remove the water. In major flooding situations, professional water extraction is non-negotiable for effectively removing the bulk of the moisture.
Remove Wet Items from the Area
Do not let your belongings sit in a damp room. To successfully prevent mould after water damage, you must clear the affected area. Evacuate the following items immediately:
- Rugs
- Upholstered furniture
- Cardboard boxes
- Books and paper goods
- Wet clothing
- Curtains
- Soaked insulation
- Carpet padding
Increase Airflow and Ventilation
Airflow is your best friend when trying to dry out water damage. Open your windows if the outdoor humidity is low to encourage fresh air circulation. Use fans carefully to keep air moving around wet surfaces. However, be cautious not to blow air directly over visibly contaminated areas, as this can spread mould spores into unaffected rooms.
Use Dehumidifiers to Control Humidity
Running a dehumidifier after water damage is a vital step. Dehumidifiers actively pull excess moisture from the air, lowering the relative humidity of the room. By removing the airborne moisture, you eliminate the very conditions that support microbial growth.
What Materials Are Most at Risk for Mould?
Drywall and Insulation
Drywall and insulation act like giant sponges. They absorb water at an alarming rate. Wet drywall mould prevention is notoriously difficult because the paper backing feeds the mould. If these materials become thoroughly saturated, they typically need to be cut out and discarded to protect the surrounding framing.
Carpet and Carpet Padding
Carpet fibres might feel dry on top, but the padding underneath is a different story. Carpet padding holds moisture against the subfloor, creating a dark, damp environment that is a massive mould risk. You usually have to pull up the carpet to replace the soaked padding.
Wood Floors and Subfloors
Hardwood floors and the subfloors beneath them are vulnerable to swelling, cupping, and warping. Moisture easily gets trapped between the floorboards and the subfloor. Without professional drying equipment, this hidden moisture will inevitably lead to structural degradation and fungal growth.
Cabinets, Trim, and Baseboards
Wood and medium-density fibreboard (MDF) materials are notorious for trapping moisture behind their surfaces. Water wicks up into baseboards and cabinet bases, remaining hidden in the dark cavities behind them.
Upholstered Furniture and Soft Goods
Porous materials like couches, mattresses, and cushions are extremely difficult to salvage after heavy water exposure. If they have been saturated, especially by contaminated water, they usually cannot be saved and must be discarded.
Clean Water vs Gray Water vs Black Water Mould Risks
Clean Water Damage
Clean water comes from sanitary sources. Examples include a broken water supply line, rainwater leaking through an open window, or an appliance supply line failure. While it does not pose an immediate health threat, clean water can easily lead to mould growth if it is not dried quickly.
Gray Water Damage
Gray water contains significant chemical, biological, or physical contaminants. Examples include a washing machine overflow, a dishwasher leak, or a shower drain backup. Gray water must be handled carefully, as the contaminants accelerate mould growth and pose mild health risks.
Black Water Damage
Black water is grossly unsanitary and contains harmful bacteria, pathogens, and toxins. Examples include a sewage backup, outdoor floodwater, or a toilet overflow containing waste. Black water damage requires professional cleanup every single time. The risk of black mould after water damage is exceptionally high here, and attempting to clean it yourself is dangerous.
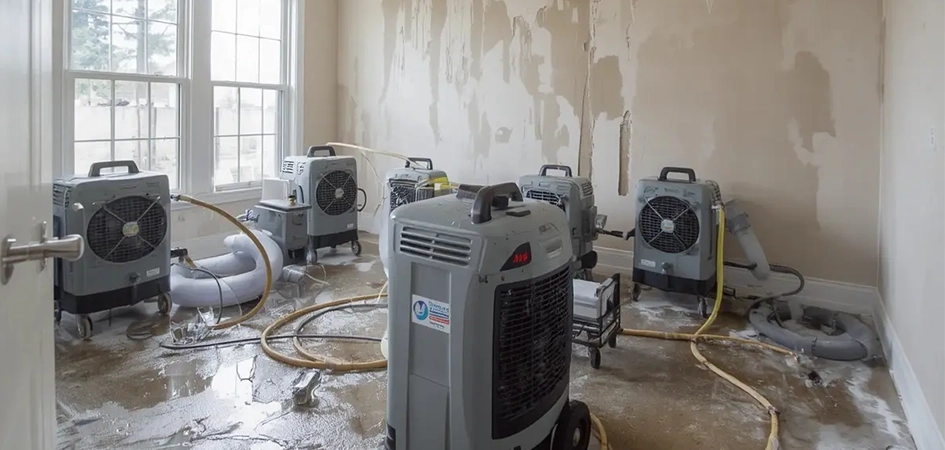
Professional Mould Prevention After Water Damage Restoration
Moisture Inspection and Mapping
Professionals do not rely on guesswork. Using specialized tools like a moisture meter and infrared moisture detection cameras, technicians inspect walls, floors, ceilings, and subfloors. This process, known as moisture mapping, identifies hidden wet zones that the naked eye misses.
Water Extraction
Basic household tools simply cannot compete with professional equipment. Restoration crews use truck-mounted vacuums and weighted extraction tools to pull standing water and deep moisture out of carpets and flooring much faster and far more thoroughly.
Structural Drying
Structural drying requires a strategic balance of equipment. Restoration experts utilize:
- Commercial air movers to force moisture out of materials
- Industrial-grade dehumidifiers to capture airborne water vapour
- Controlled airflow systems
- Drying logs to track daily progress
- Continuous monitoring of moisture levels
Antimicrobial Treatment
To further reduce the risk of microbial growth, technicians apply an antimicrobial treatment to appropriate surfaces. This step is crucial for sanitizing the area and neutralizing potential mould spores before they have a chance to colonize.
HEPA Filtration and Air Scrubbing
When dealing with potential contamination, indoor air quality takes a hit. Professionals use air scrubbers equipped with HEPA filtration to pull airborne mould spores, dust, and contaminants out of the environment, ensuring the air you breathe is safe.
Final Moisture Verification
Before any repairs, painting, flooring replacement, or refinishing begins, professionals conduct a final moisture verification. They confirm that all affected materials have reached their normal, dry baseline to ensure water damage restoration and mould prevention is a success.
Also Read: DIY Mold Cleanup vs Professional Mold Remediation in Ontario
Signs Mould May Be Growing After Water Damage
Musty Odours
Have you noticed a damp, earthy smell lingering in the room? Musty odours are often the very first indicator of hidden moisture or active mould growth. Trust your nose.
Discoloration on Walls, Ceilings, or Floors
Keep an eye out for strange stains. Discolouration often appears as black, green, brown, or even white patches spreading across your drywall, baseboards, or ceiling tiles.
Peeling Paint or Bubbling Drywall
When water is trapped behind a wall, it tries to escape outward. This pressure causes paint to peel and drywall tape to bubble. Surface damage is a glaring signal that moisture remains behind the walls.
Warped Floors or Soft Spots
If your hardwood floors start to buckle or you feel soft, spongy spots when walking across your carpet, you likely have subfloor moisture. Wood swelling is a structural concern that requires immediate attention.
Allergy-Like Symptoms Indoors
Are you suddenly coughing or sneezing when you enter the basement? Worsening allergy-like symptoms indoors, such as throat irritation, headaches, or watery eyes, often point to a decline in indoor air quality caused by dampness and spores.
Can You Prevent Mould Yourself After Water Damage?
When DIY Cleanup May Be Safe
You might be able to handle the cleanup yourself under very specific conditions. DIY is reasonable when:
- The water is entirely clean.
- The affected area is very small.
- The water was removed quickly.
- No drywall, insulation, or subfloor has been saturated.
- There is absolutely no musty odour or visible mould present.
When DIY Cleanup Is Not Safe
Sometimes, calling the professionals is the only safe option. Professional help is mandatory when:
- Floodwater or sewage is involved.
- Mould is already visible.
- Water has soaked into walls, floors, or insulation.
- The area has stayed wet for more than 24 to 48 hours.
- There are visible electrical hazards.
- Your home has recurring moisture issues.
If you are debating tackling the issue yourself, read our guide on DIY Mould Cleanup vs Professional Remediation in Ontario: What’s Safe & What Isn’t.
Common DIY Mistakes
Homeowners often mean well but make critical errors that lead to secondary damage. Avoid these common DIY mistakes:
- Only drying visible surfaces while ignoring cavities.
- Using standard household fans without any dehumidification.
- Painting over damp walls to hide water stains.
- Keeping wet carpet padding.
- Ignoring those lingering musty odours.
- Closing up walls before conducting proper moisture testing.
- Waiting far too long to call for professional assistance.
How Long Should You Run Fans and Dehumidifiers After Water Damage?
Minor Water Damage Timeline
For small, clean water incidents addressed immediately, the area might dry within a shorter timeframe. Typically, running equipment for 48 to 72 hours is sufficient for minor spills on hard surfaces.
Moderate Water Damage Timeline
If water has seeped into wet walls, flooring, or cabinets, you will require several days of controlled drying. Expect to run fans and dehumidifiers for three to five days to ensure the materials are properly restored.
Severe Water Damage Timeline
Flooded basement mould prevention requires patience. Severe incidents involving flooding, saturated insulation, or deep subfloor moisture often require professional drying and monitoring that can last a week or more.
Why Moisture Testing Matters More Than Guessing
Why guess when you can know for sure? Drying time depends entirely on variables like indoor humidity, room temperature, material density, airflow, and the duration of water exposure. Proper moisture testing guarantees the job is done right.
How to Prevent Mould After Restoration Is Complete
Keep Indoor Humidity Under Control
To keep your home safe long-term, maintain healthy indoor humidity levels. Aim for a relative humidity between 30% and 50%. Utilize ventilation fans and standalone dehumidification units where needed, especially during humid Toronto summers.
Inspect Previously Damaged Areas
Make it a habit to check baseboards, flooring, cabinets, and walls in the previously affected rooms. Look for returning odours, fresh stains, or a feeling of softness in the drywall.
Fix Leaks Immediately
Prevention is always better than a cure. Promptly repair plumbing issues, faulty appliance supply lines, roof leaks, poorly sealed windows, and foundation seepage to stop water from entering your home.
Improve Ventilation in Moisture-Prone Rooms
Proper airflow stops condensation from building up. Ensure you have excellent ventilation in high-risk areas, including bathrooms, laundry rooms, basements, crawl spaces, and kitchens.
Use Leak Detection Devices
Give yourself an early warning system. Place smart water sensors or leak detection devices near vulnerable areas:
- Water heaters
- Washing machines
- Dishwashers
- Sump pumps
- Toilets
- Under kitchen and bathroom sinks
Does Insurance Cover Mould After Water Damage?
Sudden and Accidental Water Damage
Homeowners insurance generally covers sudden and accidental events, like a burst pipe. Some policies may cover mould remediation after water damage if it is the direct result of a covered sudden event.
Flood and Sewer Backup Limitations
Standard policies usually do not cover groundwater flooding or sewer backups. You often need to purchase separate flood insurance or specific sewer backup coverage to protect yourself financially from black water damage.
Neglect and Delayed Cleanup Issues
Insurers expect you to act fast. If you delay the water damage cleanup and the problem worsens over weeks or months, the insurance company may deny your claim based on neglect.
Documentation Tips for Claims
To ensure a smooth claims process, document everything meticulously:
- Take detailed photos and videos of the damage before cleaning up.
- Identify the exact source of the water damage.
- Record dates and a timeline of events.
- Keep a log of moisture readings if professionals are involved.
- Save all restoration invoices and receipts.
- Keep records of damaged materials and discarded items.
- Hold onto professional inspection reports.
Mould Prevention Checklist After Water Damage
To stay organized during the chaos, download our Water Damage Restoration Checklist for Homeowners and follow these vital steps:
First 24 Hours
- Stop the water source immediately.
- Document the damage with photos and videos for your insurer.
- Remove all standing water.
- Move wet items, rugs, and furniture out of the space.
- Start ventilation by opening windows and running fans.
- Contact restoration professionals if the damage is significant or widespread.
First 48 Hours
- Continue drying out the space relentlessly.
- Use dehumidifiers to pull moisture from the air.
- Remove unsalvageable porous materials like soaked carpet padding.
- Check hidden areas like baseboards and subfloors.
- Monitor the room for musty odours and high humidity.
- Avoid rebuilding or repairing too soon.
After Restoration
- Confirm moisture levels are safe using a meter.
- Watch closely for musty odours over the next few weeks.
- Inspect repaired areas for any recurring signs of moisture.
- Control your home’s daily humidity.
- Repair any future leaks quickly.
- Schedule professional help if any mould signs appear.
Protecting Your Property and Peace of Mind
Learning how to prevent mould after water damage restoration is fundamentally about speed, thoroughness, and knowing when to ask for help. We covered the critical nature of the 24 to 48-hour window, the severe risks of hidden moisture, the difference between clean and contaminated water, and the detailed steps required to properly dry out your home. Taking immediate action is the only way to safeguard your property from costly secondary damage and health hazards.
Why Professional Water Damage Restoration Matters
Mould prevention is not just about drying what you can see on the surface. Moisture can easily remain trapped behind walls, beneath floors, deep inside insulation, and within structural materials. If left ignored, this trapped moisture guarantees a mould infestation. Professional restoration teams use specialized equipment to extract water forcefully, dry affected materials efficiently, monitor indoor humidity, detect hidden moisture pockets, and aggressively reduce mould risk before any cosmetic repairs begin.
Furthermore, professional support can help you secure detailed documentation for your insurance claims, ensure the safe handling of contaminated black water, provide vital antimicrobial treatment, and offer long-term property protection. When disaster strikes your Toronto home, you need trusted water damage restoration experts who can deliver reliable professional mould remediation services.
Get Professional Mould Prevention Help After Water Damage
Request a Free Water Damage Restoration Assessment today and let Property Worx restore your home back to normal.